The Deimos Isolation Vault Pillar Farm
Unlike Fortuna and Cetus, you need a LOT of resources to rank up with the Entrati. The Cambion Drift is much more resource-heavy than the previous open worlds, and constantly drains you of supplies. Not only do you need the resources to increase your rank, but you also need the resources to earn standing in general. While the token system is useful for not losing standing, you need to work a lot harder to level up and get what you need. And that means fishing, mining, conserving and doing bounties.
Luckily, there’s a solution that combines… some of these tasks. At the very least, it reduces the need to fish and mine a little. Say hello to farming pillars in isolation vaults!
“What?”
Okay yeah that’s not a catchy name. So, you know those pillars scattered around the Cambion Drift? The ones with Requiem icons hovering above them? That do weird things when you shoot them with space kid? Well, those towers will tend to drop loot when Infested are killed nearby with your Operator. Normally though, there’s not enough Infested spawning nearby to actually get anything from them.
These pillars however also appear in Isolation Vaults. And Isolation Vaults have much, much better Infested spawns. So we can farm a lot more loot from them. Here’s how to do it.
Prep Work.
You’ll need a few things before you start. Firstly, you need to be able to deal with all the Infested, especially the Saxum enemies which spawn constantly. So make sure you get plenty of Corrosive and Heat damage. As for what frame to use, ideally you want something with crowd control. But you also want someone who won’t kill all the enemies later on, because Infested need to be killed (mostly) by the Operator. Vauban works well for this since his Vortex/Bastille can group enemies together into one nice death ball.
A Necramech helps a huge amount with this. But if you haven’t unlocked it yet, then just get a good amp. If you’re going to use a Necramech, then something that generates energy orbs helps a ton, like Protea, Hydroid or Nekros.
The first step: Start an Isolation Vault as normal.
You want to start an Isolation Vault by going to Mother and selecting the Isolation Vault bounty. This can be done via the Cambion Drift if you want less loading screens. Basically, you want to do the bounty as normal, up until you kill the Necramech.
Once you kill the Necramech, DO NOT SUMMON LOID. Wait around for a bit and see if you are getting Infested spawns. This can take a few moments, especially since the Infested need to catch up after the Necramech fight. But once you’ve got a steady stream of Infested coming along, you can move on to the next step.
The second step: Figure out whether it’s a good farming spot or not.
Whether you’ll get a lot of good loot or not depends on the shape of the Orokin area. Ideally, you want the large, open Orokin vault, which often has a pillar spawning directly in front of the Esophage which you use to exit the vaults when you’re done. If you don’t have that vault, the tall, thin vault with the four crystals laid out in a C shape (starting near the Esophage) also works, and can have a pillar spawn
The smaller vaults generally have the same amount of spawns as the bigger vault, but the issue is pathfinding. Infested aren’t that smart and their paths are blocked by bigger Infested, so the pillar is best if it’s located in a larger space, with a clear path to it. The smallest vault (the one with the balcony) isn’t very good at all.
The type of pillar is also important. Vome, Jahu, Ris, Khra and Fass all affect nearby Infested and drop loot when killed with Operators. Netra will drop loot only when enemies are killed by the squealing, flying death tendrils it spawns and Lohk is basically useless. Xata is one of the other seven effects, picked at random.
If you don’t get a good spawn, your only real option is to summon Loid, open the vault and then reset start again. You might as well grab Loid and open the vault, as it does give some resources.
If you do have a good spawn though, then you can start farming!
The third step: Summon your Necramech, hit the pillar and go ham.
Now, all you have to do is activate the pillar and start murdering Infested. Just make sure to keep an eye on the pillars and make sure they are reactivated, and that the Infested get close enough.
Your Necramech will take a bit of a beating, but don’t worry. Even if it dies, you can re-summon it after 2-3 minutes, and go back to farming. You can also use pillar farming to help level up your Necramech or Archwing Guns, as well as gilded amps.
Eventually though, the pillars will break and you won’t be able to activate them any more. You now have two options. Your first option is to reset, return to the Necralisk and start again. Alternatively, you can move on to the next isolation vault and start again, but with higher enemies.
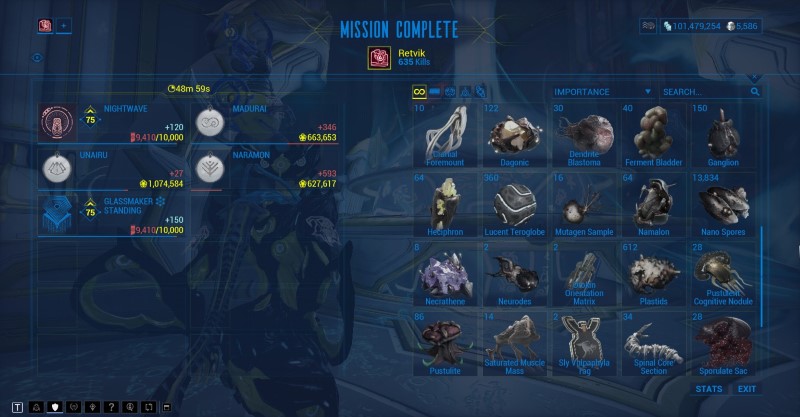
Hopefully, you’ll get lots of loot from this, and at least save some time from mining and fishing!